The stock Champion 600 circuit is roughly based on the Vibro Champ AA764 circuit (without the vibrato circuit of course). Fender has incorporated a tone stack from the AA764 but eliminated the bass and treble knobs by replacing the pots with fixed resistors. The result is a tone with a strong mid cut and a significant gain loss between the first and second stages.
This was my quick test to see how the amp sounded with the tone stack removed from the circuit and a coupling capacitor substituted for it. I've used a fairly large value here - .1 uF. The 5E1 and 5F1 Champ circuits both used a .02 uF coupling cap instead of a tone stack. This is a good place to start if you're trying to get your Champion 600 closer to one of those earlier circuits.

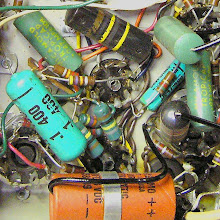
The coupling cap is tagged in from the top of C1 to the bottom of R21. The end of R19 needs to be lifted to disconnect the tone stack. The result is a more even frequency response and a good deal more drive to the second stage. I've done my 12DW7 mod to this amp, so I needed a bit of extra volume. With the tone stacked bypassed in a stock amp the breakup of the extra gain of the dual 12AX7 stages will make the amp lot dirtier. I'm looking for more clean headroom but a lot of people might go for the added drive.
THE UBIQUITOUS DISCLAIMER: AKAVALVE ASSUMES NO RESPONSIBILITY FOR THE SAFETY OF ANYONE IMPLEMENTING THESE INSTRUCTIONS. IF YOU ARE NOT FAMILIAR WITH SAFE PRACTICE IN HIGH VOLTAGE CIRCUITS, DO NOT ATTEMPT THIS YOURSELF.
Like most of the mods I've done on this Champ 600, I'm going to make this one switchable. You can leave the mod like this if you choose but if you do it's good practice to tidy up the end of R19 by either removing it completely or insulating the lifted end with shrink tubing.


19 comments:
thank you for posting the results of your tests. i recently bought a champ myself and i want to check out the available mods for something that's really worth voiding the warranty :P
can you also post some A/B sound tests? it would definitely help people decide.
i'm null at electronics btw but the amp is simple enough so i don't ruin it
Thanks for looking around.
I've got a few more things I'm going to do this one and I'm waiting on a new speaker.
When I'm done I'll get some sound clips up. Should be in the next week or so - so do check back!
PS: I'll put together a post about discharging the caps - it's simple but very important to do before poking around inside your amp.
This site is great, thanks so much for taking the time to do all these. I'm really interested to hear the clips of stock v. removed negative feedback.
I'm getting some great tones out of mine after a tube swap, but the transition into distortion is REALLY unpleasant. I don't need more gain - just smoother breakup that doesn't sound like a kazoo.
anyway, here is a vid I just made. amazing clean sound quality
http://www.youtube.com/watch?v=fphd0hUaeVU&feature=channel_page
Hey Scott,
If you're using an external cab you might like it with the loop completely disconnected but it'll probably fart out the stock speaker even more so. Even through an external cab with a Tele I prefered the sound of the amp with at least a bit of bass reduction - especially when it's driven into distortion.
I didn't put a switch in to remove the negative feedback completely because the guy I'm doing this amp for plays a Les Paul so he really needs a good bit of bass roll off. I am partly removing feedback loop (by shunting instead of disconnecting) as part of the Presence Plus mod. Taking out the loop completely smooths the transition into distortion but it makes the amp significantly darker sounding as well. The Presence Plus thing is an attempt to strike a balance between that smoothness and some bass cut.
I have some repairs to get through this morning but if all goes well the plan is to record some clips this afternoon.
Hi Akavalve! Thank you so much for so many good information!
Just wanted to ask one thing. Can I do a simple version of this mod by lifting the r19 and adding a switch to go back to the standard champion 600, or will I absolutely have to add the capacitor? ( I am afraid ths might change something in stock version, which I really like, but every now and then I want more distortion)
If I may ask one more question...
I bought my champion in Portugal, and the energy is provided at 230 V and 50 Hz. I am taking it with me to Brazil, where the specs are 127 and 60 Hz.
I can always use a converter, but I am concerned about the 50/60 hz difference.
I was told that fender normaly makes the output transformers able to work with both, but since this is a cheap Chinese amp, I am a little skeptical.
Do you know if it will be ok? (or if there will be side effects?).
Thanks!
André
The way that new cap is implemented in the Tone Stack Bypass / Fat Switch Mod the cap is not connected to the circuit with the switch in the "stock" position. So you don't have to worry about it from the sound perspective.
You'll get a bit more gain in the "bypass" setting with the cap installed. But you want to save yourself the trouble, just lifting R19 will get you most of the way there.
I'd worry about going in the other direction. But since yours is designed for 50 Hz, going to 60 Hz won't be a problem.
The beginning of this article mentions the bass & treble pots being replaced by resistors.
Does anyone know which 2 resistors on the Champ 600 replaced the bass & treble pots?
R20 and R21 form a voltage divider for the treble control. The sum of those 2 resistors is 255K - so to replace them with a single part, use a 250K pot. The pot is substituted for the 2 resistors in series and the original junction of the two is connected to the wiper.
For the bass control, replace R22 with a 1 meg pot with the wiper tied to one end.
Thanks for your reply. I put 3 pots for bass, mids & treble just to be ridiculous. I'm loving it & now I've made it my goal to make the champ 600's front panel look like an airplanes control panel.
I'm pretty new to modding & schematics. I have been trying to figure out how to add a 3 point Off/Bypass/On toggle switch.
Can this be achieved using the schematic at the top of the "Cathode Bypass Mod Pt 2" page?
Am I supposed to connect C3, C4 & C10 to the toggle? Can you lead me to a place that will give me a step by step?
Thanks for your help!
The connection points in the circuit would be the same as in the Cathode Bypass Mod.
I'm not sure exactly what you mean by "off" and "on" (I assume the "bypass" is stock). Let me know specifically what you want each of the positions to be and I can guide you through it.
I'd like to first position to turn the amp off as usual.
I'd like the middle position to put the amp in warm up mode, as to heat up the filament to prolong the life of the tubes.
I'd like the third position to turn the amp on as usual.
Thanks for your help!
Oh, you're looking to put in a standby switch. I though this was related to the tone stack.
If you want to do this you'll want a two pole "progressive switch". Connect the heaters to the first position and both sides of the HT secondary to the second position.
A good number of sources will tell you that "cathode stripping" (i.e. shortened tube life due to cold cathodes at power on)isn't really an issue in the vast majority of amps.
Here is an excellent treatment of the subject.
I haven't ever done side by side tests for tube life with and without a standby so I can't give an experimental verification. But personally I don't bother with one in amps this size.
Great info on your blog, thinking about using your mods on my champ. Since it is based on the vibrochamp, i'd love to see a vibrato mod ;)
Excellent posts on this blog! Helps me to figure out the inner workings of my amp. I was wondering why you use the larger value for the coupling cap: .1uF instead of .02uF? Is it true that this larger value makes the amp more bassy?
There is an error in the photo. The bypass cap should be soldered to the other side of C1 (the side connected to R18). Otherwise the bypass cap is in series with C1, and you'll get a high pass with a 3dB around 600 Hz. Not good.
You're right. I've checked the circuit board I've just removed and the bottom pin of C1 is connected to R21, which makes the 0.1u cap in // with R21 (R21 is replacing the treble pot in the ch600).
Speaking of this high pass filter, according to Duncan's TSC, it cuts 3dB from 0 to 600Hz (when R19 is lifted).
i've managed the mid-pot to R19; works perfect as a Tone-Knob! Actally it's a little bright, so i think about a treble-pot. Ok; these are r 20&21. But i don't get it how to connect the pot... which spot goes to whitch nose of the pot?
thx, frank
Post a Comment