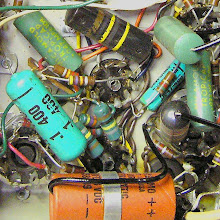
This pic shows the shows a few of the mods I've made to this Champion 600. The two small red switches on the bottom of the chassis are for my Presence Plus and Input Voicing modifications. This particular post concerns the tone stack mod associated with the two bigger switches to the upper right.

This mod takes the coupling cap mod from the Tone Stack Test and hardwires it to a switch so the amp can use the stock tonestack or bypass the tonestack with a single coupling cap to eliminate the mid cut in the stock circuit. The right had switch below handles that job. The left switch acts as a three position "fat" switch.
First....
THE UBIQUITOUS DISCLAIMER: AKAVALVE ASSUMES NO RESPONSIBILITY FOR THE SAFETY OF ANYONE IMPLEMENTING THESE INSTRUCTIONS. IF YOU ARE NOT FAMILIAR WITH SAFE PRACTICE IN HIGH VOLTAGE CIRCUITS, DO NOT ATTEMPT THIS YOURSELF.
Here's the finished mod from above:

The combination of resistors on the "fat" switch are selected to combine for three settings:
15K (stock), 30K (Frondelli Mod fat boost value), and 47K (for a little extra boost). The boosts effect the mids most dramatically, but they provide extra gain across the whole spectrum too.
All three resistors connect to the same pin on the right hand switch - the one just to the left of the center pin with the black wire.

The switches I used here each have one more set of contacts than are needed to make the mod. I frequently do this when I'm experimenting so that if I decide to add something to the switch later on I don't need to disassemble the circuit and solder in a new one.
The resistors in the fat boost circuit replace R19 on the pc board. Here's how the wiring runs:

Here's the coupling cap, prepared for installation:

And here it is soldered in place. Since only one end is really fixed and the other will be supporting a wire I put a bead of silicone underneath to make sure it stays in place.

Here's how the wires are run to the switch. Point "A" on the switch runs to point "A" on the board. Same for "B" of course.
 Here's the frequency response for the four settings measured at the amp output with a 4 ohm resistive load:
Click on the graph for a high res version. From the bottom to the top the curves are for Stock, Fondelli Mod Fat Boost, Extra Fat Boost and Tone Stack Bypass. The tone stack bypass curve is up about 16dB up at the mid cut frequency!
A final note...if you try this one yourself, be careful to place the switches low enough so they clear the cabinet when you put the chassis back in. It a tight fit.


18 comments:
Nice work. What switches did you use?
I've done the fat switch mod using a DPDT switch. I would like to make it footswitchable while keeping the switch. How would I go about that?
Can you please tell me how I can go about doing only the 3 way boost mod without the bypass switch? I have the 3 way mini toggle (with the six lugs) and the proper resistors, but I am not sure how to connect everything.
To install the 3 way fat boost without the tone stack bypass:
The junction of the three resistors that connects to the tone stack bypass switch just needs to be connected directly to the black wire from the tone stack switch that leads to the bottom of R19. Make sure to do this in a way so that it is not free to move.
The yellow wires connected to the tone stack bypass switch are eliminated. The large .1uF capacitor is also eliminated.
That should do it. Let me know if you need any clarification.
Best, Andy
I'm thinking about this mod, but I'd like to put a pot and cap there instead of resistors, I'm just wondering what values would be best for giving it the "fat" boost. This is my first messing around with the insides of the actual amp here, so assume that I know nothing, all help is appreciated.
Great mods!
I have a question: how can I do the bypass mod without the fat mod? Thanks!
I would also like to know how to make a tone stack bypass switch by itself. also how much louder does it seem when the stack is bypassed?cell2057Cell2057cell
I too would like to know how to do the bypass switch without the fat switch.
Actually after thinking about it, it's pretty obvious how to just do the bypass switch. Thanks for the detailed pictures!
what is the bypass switch that you use for the tone stack bypass ?!
on-none-on ?!
3 way or 2 ?
It just needs to be an 2 pole ON-ON. The one that shows in the pic is 3 pole, but one is not used.
Best, Andy
Hello:
Sorry to barge in here, but if you are bypassing the tone stack with a 0.1 uF capacitor in series with C1, the net capacitance, assuming you disconnected the tone stack at R19, is still 150 pF, as stock. If you have the capacitor in parallel, the value is 0.1 uF.
I bypass the tone stack and use a 0.0033 uF cap switched in parallel with the stock 150 pF, but on the "other side" of the 150k R21.
This seems to give very good results, and I was wondering if you have tried it.
Thanks, and
Best Regards,
e
.::.
Hello Eolon,
It's been a good while since I've done this and I don't have a board in front of me to check, but the idea was to take the signal from pin 1 of the first gain stage and connect it to the top of the volume control using a large enough capacitor to swamp out any effects from the tone stack. So the 0.1 uF cap should be in parallel with the 150 pF cap and R21. I think the measurements bear that out, but If it is actually in series, that' s my error....maybe someone with an open amp can check?
Best, Andy
I confirm that your mod shows the bypass cap in parralel of C1 and only C1. The 0.1µ cap should have been soldered to the other pin of C1.
Ooops, just wrote it wrong. I meant your picture shows the 0.1µF cap in parralel with R21.
Big thank you to akavalve for this site, it is fantastic! And thanks to everyone who has posted comments :-)
Eric, just to confirm then, where should the cap be spliced in? ie which end of c1 and r21?
Also, with the fat switch, is it possible to use a pot rather than the three resistors? If so which value would be best?
Thanks again!
Simon.
Hi.
The FAT SWITCH, it's an ON/ON/on DPDT switch?... or I can use a ON / ON switch?
Thanks!
Hello,
this is a great source of Information, thanks for the great pictures!
I just got a Gretsch Electromatic G5222 amp (same as the Fender Champion 600). I will be performing some modifications which I got from alnicomagnet, mainly to reduce the hum/noise and to include a stand-by switch for the main power switch.
I would also like to make the pre-set sound stack (AA764 voicing) switchable, similar to what you did, but without the fat switch functionality. I want to get close to the so-called 5E1 voicing.
Based on the modification you did here, if I want to do that but without the fat switch, how do I need to wire that? I am a bit uncertain since this is my first amp project. Can I leave R19 where it is and just lift off one leg and go from there? Or do I have to remove R19 and bring it to a different position? And the additional coupling cap, can that stay where you have it in your Pictures?
Any help you could provide to help out a newbie with regards to amm modifications would be much appreciated.
All the best,
Roland
Post a Comment